
HAPPY HUMP DAY EVERYONE! I’m soooo excited to share my Makeup of the Month with you all! Seriously was SLACKING last month and didn’t even get to do one! This month, I’m sharing with you my absolute FAVORITE products to use for “Baking” (or “Cooking”) your face! I know what you’re thinking, “What does that even mean?” If you’re a makeup artist, you know what I’m talking about, but if you’re a beginner or even just someone who loves makeup and is looking for something new to try, keep reading!
The Scoop- First off, I’m no expert. I spent my fair share of days (well, probably weeks) researching just exactly what the hype was about baking your face when i first heard about it. After much time spent trying to decide if I thought it was beautiful or down right cartoonish, I realized I had to try it.
So, what really IS baking? It’s pretty much just setting your foundation and concealer for a little longer than usual using a (loose) translucent setting powder. By applying the powder in areas that you would normally highlight, specifically the undereye area, center of the chin, bridge of the nose, and under the hollows of your cheeks (under your contour) and letting it sit for 5-20 minutes (the longer it sits, the more dramatic the effect) before blending it out, you’re stirring up a recipe for a perfect, almost air-brushed makeup look! Honestly, this is nothing new, as drag queens have been slaying this technique for years. I’m surprised the makeup community hasn’t adopted the technique until now, because it seriously CHANGED my face game, no joke. And don’t worry, this method works for all skin types and colors. Trust me, I’m the palest girl in the game with combination skin and I can rock it!
The Overview- As a skeptic of the craze, I took a lot of time to really decide what products I would use to “bake.” After watching all the tutorials, from Huda Kattan (HudaBeauty) to Heidi Hamoud, I set my choice to the Laura Mercier Translucent Loose Setting Powder and my handy dandy set of Beauty Blenders (Pro and Minis, I’ll explain later on!)
Now, this is honestly such a flawless combination, but you can really use ANY loose setting powder you want. Ben Nye banana powder is another popular choice (which is ACTUAL stage makeup!), and you can even pick up a powder at the drug store. Don’t have the money to blow on beauty blenders? Pick up a Real Techniques Miracle complexion sponge at Ulta for $6 or even just regular old makeup sponges will do! Whatever you choose, it’s all about the technique!
The Look-
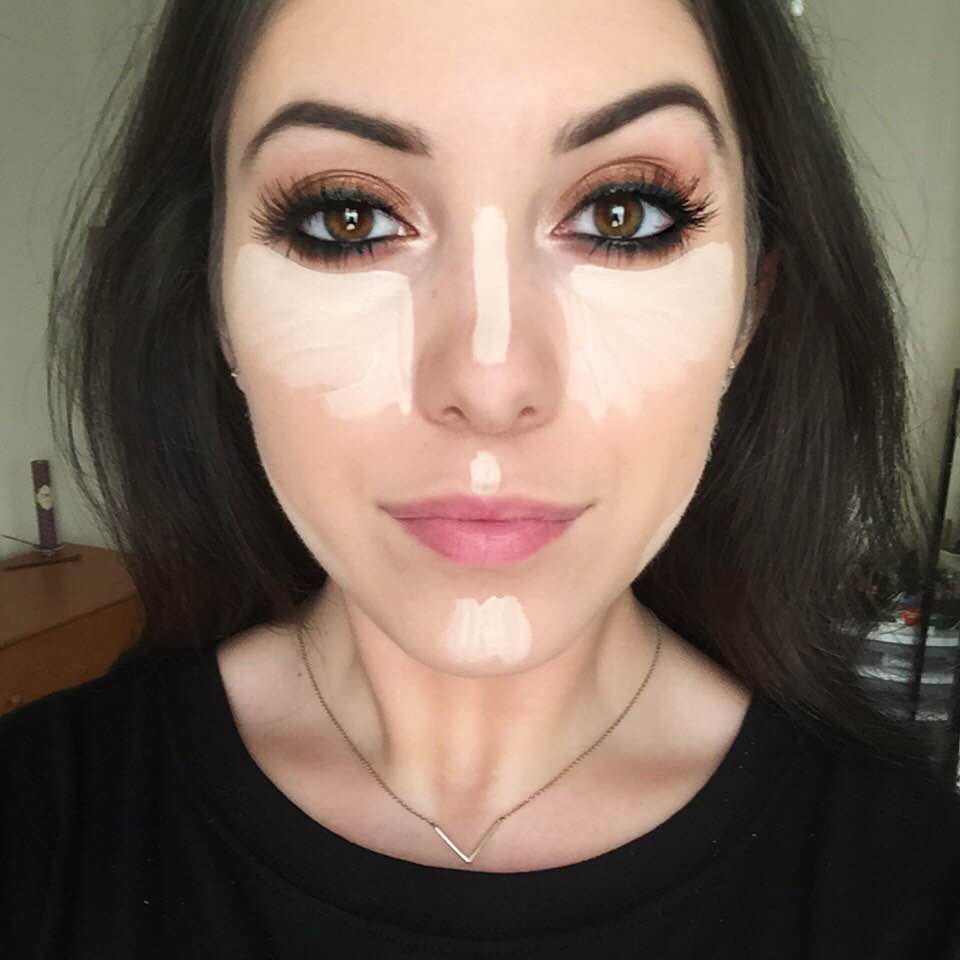
- Apply your foundation and concealer as usual. If you’re not familiar with how to use concealer to highlight your face, here are the key areas you should be concealing:
- Using a concealer at least 1 shade lighter than your coloring, apply it to the undereye area, center of the chin, cupid’s bow, on the bridge of the nose, center of forehead, and under the hollows of your cheeks (area between contour and jawline).
Of course, all of this is up to you. If you want a more subtle highlight, I suggest concealing just the undereye area, chin, and bridge of the nose. Blend all of this out using a DAMP beauty blender (or a buffer brush if you prefer this method). The reason I have my MINI beauty blenders in on this is for blending out the undereye area. These little guys are a DREAM COME TRUE. Since they are so small, it’s soooooo much easier to accurately blend out this area to avoid messing up your eye makeup and to get in those tough areas like the inner corners and sides of the nose.
In the first photo, I’ve applied my foundation only. I used Loreal Infalliable Pro Matte in the shade 103 and applied it using the Sigma F80 Kabuki brush, then used a beauty blender to buff out any imperfections.
In the second photo, I’ve applied NYX HD Concealer in “Fair” on the areas of my face I want to highlight (I skipped my forehead because sometimes it gets a little dry!)
2. or 5. Contour your face. This step can either be done second, or last. It’s entirely up to what you prefer. I like to contour as usual before I bake, that way if I overdo it or have a messy contour, I can easily clean it up with baking.
3. Apply your setting powder. Using a DAMP (and i mean D A M P) Beauty Blender, apply your setting powder to the highlighted areas of the face. Do not blend it out, just pack it on by tapping it on the areas of the face that you highlighted with concealer.

4. WAIT! Anywhere from 5-20 minutes will do. It all depends on how intense you want your face to bake. I usually wait about 10, and while I’m waiting I’ll fill in my brows or do my lips to pass the time.
5. Blend it out! With a light hand, take any face powder brush, particularly a domed or highlight brush, and blend out your setting powder. I like to use my Morphe M320 brush. After that I will put on blush and a highlight as usual. If you have drier skin, or fear your face looks too powdery, spray your face with a setting spray to finish the look. I like to use NYX Dewy Setting Spray or MAC Fix+. This helps brings out the glow in your face and keeps you looking hydrated.

Still don’t really get what the point of baking is? Try it for yourself. As you can see from this that baking really defines your face. It pretty much blurs out imperfections and eliminates undereye creasing. It helps my contour stand out and brightens my appearance. Baking is the way to (the illusion of) perfect skin! It’s easy to get carried away while doing such a dramatic application like this, so what I suggest is PRACTICE! I didn’t get decent at this overnight, and I’m still working on different techniques. I don’t want you to think I know everything, I’m just sharing the way I found works best for me. I’d love for you to experiment with this and let me know your own way of baking, that way we can get better together!
The Review- I know this turned into more of a tutorial than a product review, but here are my reviews for this month!
Laura Mercier Setting Powder- 4.5/5
This powder is perfection. Nothing on the market touches it in my opinion. It’s lightweight, fine, blends beautifully, and doesn’t crease or wear off during the day. If you’re going to try out baking, this is my number 1 recommendation! Only downside is that it is pricey. However, for the quality of the product and its results, it is well worth the price.
Beauty Blender Pro and Minis- 4.5/5
No beauty sponge is designed quite like the original Beauty Blender brand. Something in their formula just beats the rest, it’s hard to explain. Now, I still use other brands from time to time, but there’s just nothing close to the quality. You definitely get what you pay for. The fact that they have different sizes for target areas also pushes them up in the ranks. The one thing I would say about them is that it soaks up a little more product than I would like it to. And you have to wash these bad boys RELIGIOUSLY to avoid bacteria and mold build up. Very high maintenance products!
